Yom Kippour War

Monday, February 11, 2019

Cry Havoc game maps

The Cry havoc series had some great game maps for the player.  Their forest, cities, Ports and Castles would be great for any skirmish game.  These would work great for saga.  A quick set up of a battlefield.  The maps are colorful and bright.  Here are a few for you to see.  Most of them can be purchased from noble knight. Follow this link:Cry Havoc


Saturday, February 9, 2019

Cry Havoc rules

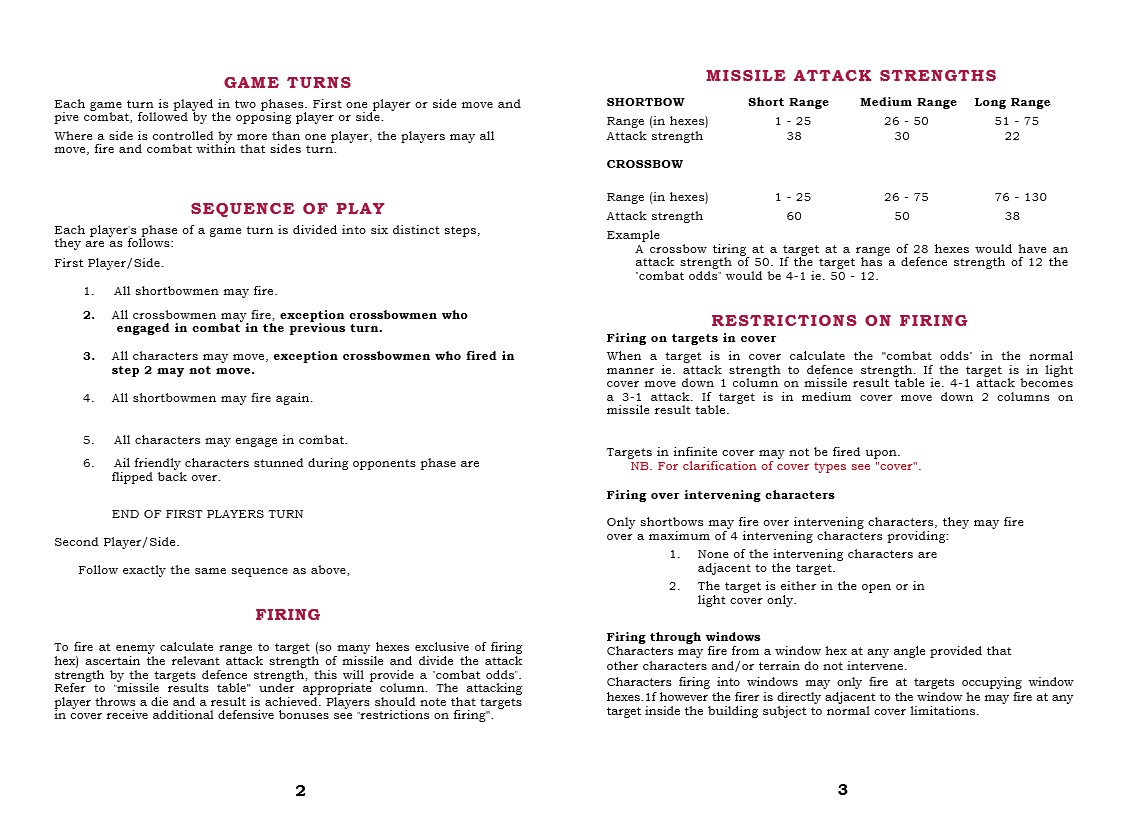
After yesterday posting about Cry Havoc. I dug up the rules. I forgot how simple a rule it was.  Remembering playing the game with friends in the 80's.  We had a blast!  Next thing you know we had figured out away to convert for miniature use.  Looking at today new rule set that are mostly over complicated, it a pleasure to read the "Cry Havoc".   My rules and game broad have been hidden for 30years.  As my wife had buried them in the bottom corner of bed room closet. The only reason I found was that I looking at place to run some video cable.

Here they are all eleven pages for the basic rules.  Tell me what you think?


Friday, February 8, 2019

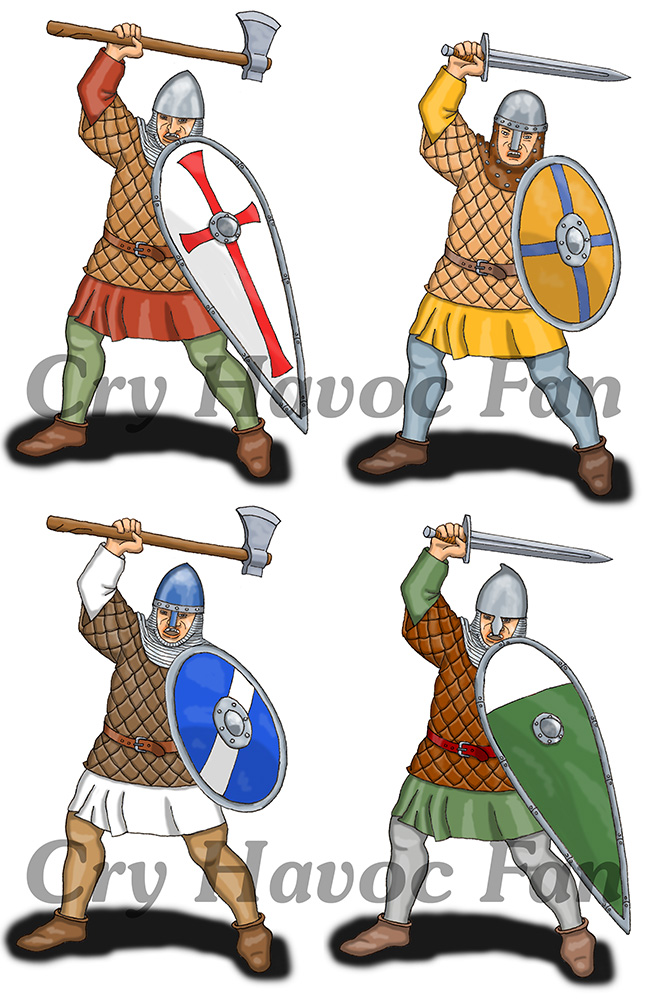
Some Crusades uniform reference

The images are from the broad game "Cry Havoc".  If you are not familiar with this game. It was very popular in the 80's.  Can of died when the publisher folded.  But lucky for the gamers it is available via Noble knight or direct from France.   I was amazed at the following the game was today.   Here are the image that could be used for painting your Saga miniatures.


Wednesday, February 6, 2019

MLR4 Sneek attack by Jim McLeod


HISTORICAL ACCOUNT LOCATION:
The village of Sneek, Holland DATE: 16 April 1945 COMMENTARY: The war in Europe was drawing to a close. The First Canadian Army directed its efforts to cutting off the remnants of the German army still in Holland. Across flat soggy fields and along the dykes, Canadian rifle battalions were engaged in the grinding task of capturing village after village until they would eventually reach Zuider Zee. In many cases, the weary German defenders put up a token resistance before surrendering. The average Landser was well aware that the end was near. On 16 April, A Company of the Queen’s Own Rifles of Canada queued up to make another assault on another Dutch village. With a bit of luck the defenders of Sneek would not put up much of a fight but as the Canadian infantry began to move forward the soldiers of the 12th SS Panzer Division readied their weapons. A Company was met with heavy small arms fire as they neared the village of Sneek. The Wasp carrier supporting the attack drove along the top of the dyke as far as the bridge where it expended all its fuel in an ineffective attack on a German position. As the Wasp left the scene a carrier came roaring along the road atop the dyke but was destroyed by fire from an anti-aircraft piece. The Canadian assault was faltering when Company Sergeant Major Charlie Martin (who had fought with the regiment continuously from the D-Day landings on and had earned the Distinguished Conduct Medal and the Military Medal along the way) ran up the road to get the forward platoons moving again. As he cross the bridge, CSM Martin was seriously wounded by German fire. Seeing the veteran NCO fall, the men of A Company moved forward to his aid and attacked onward into the village. After a short, sharp fight, German resistance melted away in Sneek and the remaining defenders surrendered.


Tuesday, February 5, 2019

MLR3 Mooshof Melee by Jim McLeod


HISTORICAL ACCOUNT LOCATION: Mooshof, Germany DATE: 26 February 1945

COMMENTARY: Operation Blockbuster went in 25 February with the capture of Calcar-Udem Ridge as its goal. This attack rapidly became a desperate struggle for the towns, villages and individual farms that dotted the battlefield. The first rate troops of the 17th and 18th Fallschirmjager Regiments fought fanatically for every yard of ground now that they were defending their homeland. The 8th brigade of the 3rd Canadian Infantry Division was having a particularly rough time. In the face of withering fire, Canadian assaults were slowed and halted. At the hamlet of Mooshof, D Company of the Queen’s Own Rifles of Canada was stuck in front of their objective after two of their assaults were repulsed by the Fallschirmjager. It was here that 23-year-old Sergeant Aubrey Cosens was about to become a legend to the men of the Queen’s Own. After putting down a sharp German counter-attack, Sergeant Aubrey Cosen’s platoon commander lay dead in the mud and Cosen’s new command numbered only four men. Climbing atop a newly arrived tank, Cosens ordered the tank to charge into the midst of another German counter-attack, which scattered the startled paratroopers. Through a rain of machine gun and mortar fire, Cosens has the tank smash into one of the fortified farm buildings where he jumped off and killed many of the defenders and captured the rest. With his tiny platoon gathering prisoners and providing covering fire, Cosens charged into the second building and found it empty. Covered by the tanks fire Cosens charged into the third building, again killing or capturing its defenders as his awed platoon followed up. D Company was reduced to 36 men, from the 115 that crossed the line at 0430, but German resistance in Mooshof was broken. Sergeant Cosens gave orders to consolidate the position but as he made his way to report to his company commander, Cosens was killed by a sniper. For his outstanding gallantry, initiative and determined leadership that morning, Sergeant Aubrey Cosens was posthumously awarded the Victoria Cross


Sunday, February 3, 2019

ASL MLR2 Troteval Farm by Jim McLeod

: The Canadian Army’s role in ‘Operation Goodwood’ was known as ‘Atlantic’ and like the big attack, ended with less than spectacular results. The Canadian 6th Brigade of the 2nd Infantry Division was tasked with capturing the village of Verrieres, which sat atop a ridge of the same name. The assault went in 19 July and after making good progress initially, the Germans counter-attacked in force and badly cut up the leading Canadian battalions, the Queen’s Own Cameron Highlanders and the Fusiliers Mont-Royal. Pushed back to their original start line, the FMR were ordered to recapture Troteval Farm in preparation for the Royal Hamilton Light Infantry’s attack on the village of Verrieres. The FMR, battered from its previous actions, amalgamated the remnants of the rifles companies into one full strength company and attacked the farm at 2200hrs. Led by Major Jacques Dextraze, the French-Canadians made a spirited assault supported by the tankers of the Sherbrooke Fusiliers and they quickly encircled the German defenders with a pincer attack. Making the final assault with grenade and bayonet, the Fusiliers captured their objective within an hour, thus securing the start line for the ‘Riley’s’ effort on Verrieres Ridge the next morning.


Saturday, February 2, 2019

ASL scenario MLR Hana-Saku by James McLeod

This will be doing a series of ASL scenarios by James McLeod.  As far as I know they are free for anyone to use.   James passed away in 2009.  He was the driving force behind ASL in Canada to many years.   It is my hope to see people play his great scenarios.   This way his creative scenarios and love of the game will go on.


Friday, February 1, 2019

David Imrie Step by step part 3


19. When painting metal I feather in the highlight. Feathering is when you gently spay the bristles of the brush open as you paint. Takes practice and a light touch.
No photo description available.

20. The metal is now given a wash of brown and black paint. Just enough to darken the metal in the bottom parts.
Image may contain: food

21. The paints I use to make the metal wash.
No photo description available.

22. The helmet and weapon are highlighted by adding Citadel Runefang silver to the Ironbreaker and then feather or blend it up to the very top metal parts.
Image may contain: one or more people

23. The figure is now dressed by giving him an off white hood, Valejo desert yellow with Citadel Ulthan White ( grey white) added in tiny amounts working up by adding more as I highlight.

Image may contain: 1 person

The red combo.
No photo description available.

The off white combo.

Image may contain: text

The Brown and leather are all mixes of these paints in various amounts. This helps it all tie together. I wash all the brown with agrax before highlighting.

No photo description available.

The face all done.

Image may contain: 1 person


Image may contain: one or more people


Image may contain: one or more people

David Imrie step by step Part 2


9. I now add Panzer Ace Highlight flesh in small amounts continually working up to just the very top highlights.

Image may contain: food

10. This is a slow process. Think subtle!

Image may contain: 1 person

11. The face taking shape.
Image may contain: 1 person


13. This image shows where the highlights should be. I have added a little black to the base flesh and run a wash over the top lip and chin, this gives the impression of unshaved. The lip is highlighted with Foundry terracotta B then some base flesh is added to lighten it. I now run some of the skin highlight mix along the edge of the top lip.

Image may contain: one or more people

14. All the paints used on the face and hair.

Image may contain: 1 person, food

15. The hair is painted Brown and chin strap added.

Image may contain: 1 person, outdoor

16. A close up of the face at this stage.

Image may contain: 1 person


17. Paints used on hair. Brown with Black then add Brown to highlight.

No photo description available.


18.The helmet is painted a mid silver. Used Ironbreaker from Citadel.
Image may contain: indoor

David Imrie Step by step on painting a figure Part 1

That the information is off of Saxon Dog face book page from July 2018.  David is one of my favorite Miniature Painter. I wish I could come close to his painting one day.  All photos and text of David's from his face book page.  Enjoy the work and instruction of a master painter


1. Clean up the figure and attach the weapon by drilling out the holes in the hands. Claymore Castings are very clean figures.

No photo description available.


2. File down the bottom of the metal base so the figure doesn't look to high off the ground when based up.


No photo description available.

3. Brush away any dust. The figure is ready for paint.


No photo description available.

4. Spray the figure grey. Think light coats of paint is best. Keep the can moving across the figure as you spray.
No photo description available.

5. New brushes.

No photo description available.

6. I wash the figure in a 50/50 mix of Nuln and Agrax. I have 50 year old eyes and this helps bring out the detail. Thin layer and don't let the ink pool in the high places of the figure.

Image may contain: drink

7. Base flesh is a mix of Panzer Ace Base and Shadow colour. Just add enough Shadow to darken the base flesh. Think subtle.

Image may contain: food

8. Now a thin layer of the base coat covering all the face except for the deep recessions.
Image may contain: food